Server Pipelines
CHTC Overview
Our lab has access to powerful computing resources and support through the Center for High-Throughput Computing (CHTC). Our core bioinformatics and image processing pipelines will be deployed through CHTC servers. All pipelines will be maintained on GitHub and associated with Docker environments to ensure reproducibility. Many of our pipelines will use Nextflow. Consult official CHTC documentation before getting started.
Register for an account using this form to access CHTC and our prioritized lab server node.
-
Execute (Compute) nodes: The CHTC has an extensive set of execute nodes. Our lab has a prioritized node that can be accessed on-demand using a designated flag.
CHTC Compute Nodes
- Dedicated lab node: 40 cores (80 hyperthreading), 512 GB RAM, 3.8 TB HD
- Typical nodes: 20 cores, 128 GB RAM
- High-memory nodes: e.g., 80 cores, 4 TB RAM
- GPUs for machine learning jobs
-
Submit server: Jobs on the CHTC are deployed from submit servers. You can
sshinto our assigned submit server (ap2002) to run and monitor jobs using your UW net-id and password. If you correctly updated your~/.bash_profileby following the environment setup instructions, you can use the simplesubmittosshinto the node.Connecting to CHTC submit server
# Log into submit server ssh {net-id}@ap2002.chtc.wisc.edu # Log into submit server if you have bash profile alias setup submit -
Transfer server: While movement of smaller files and scripts to CHTC be handled in a number of ways, the transfer of large files to CHTC Staging should use the dedicated transfer server.
Connecting to CHTC transfer server
# Log into submit server ssh {net-id}@transfer.chtc.wisc.edu # Log into transfer server if you have bash profile alias setup transfer -
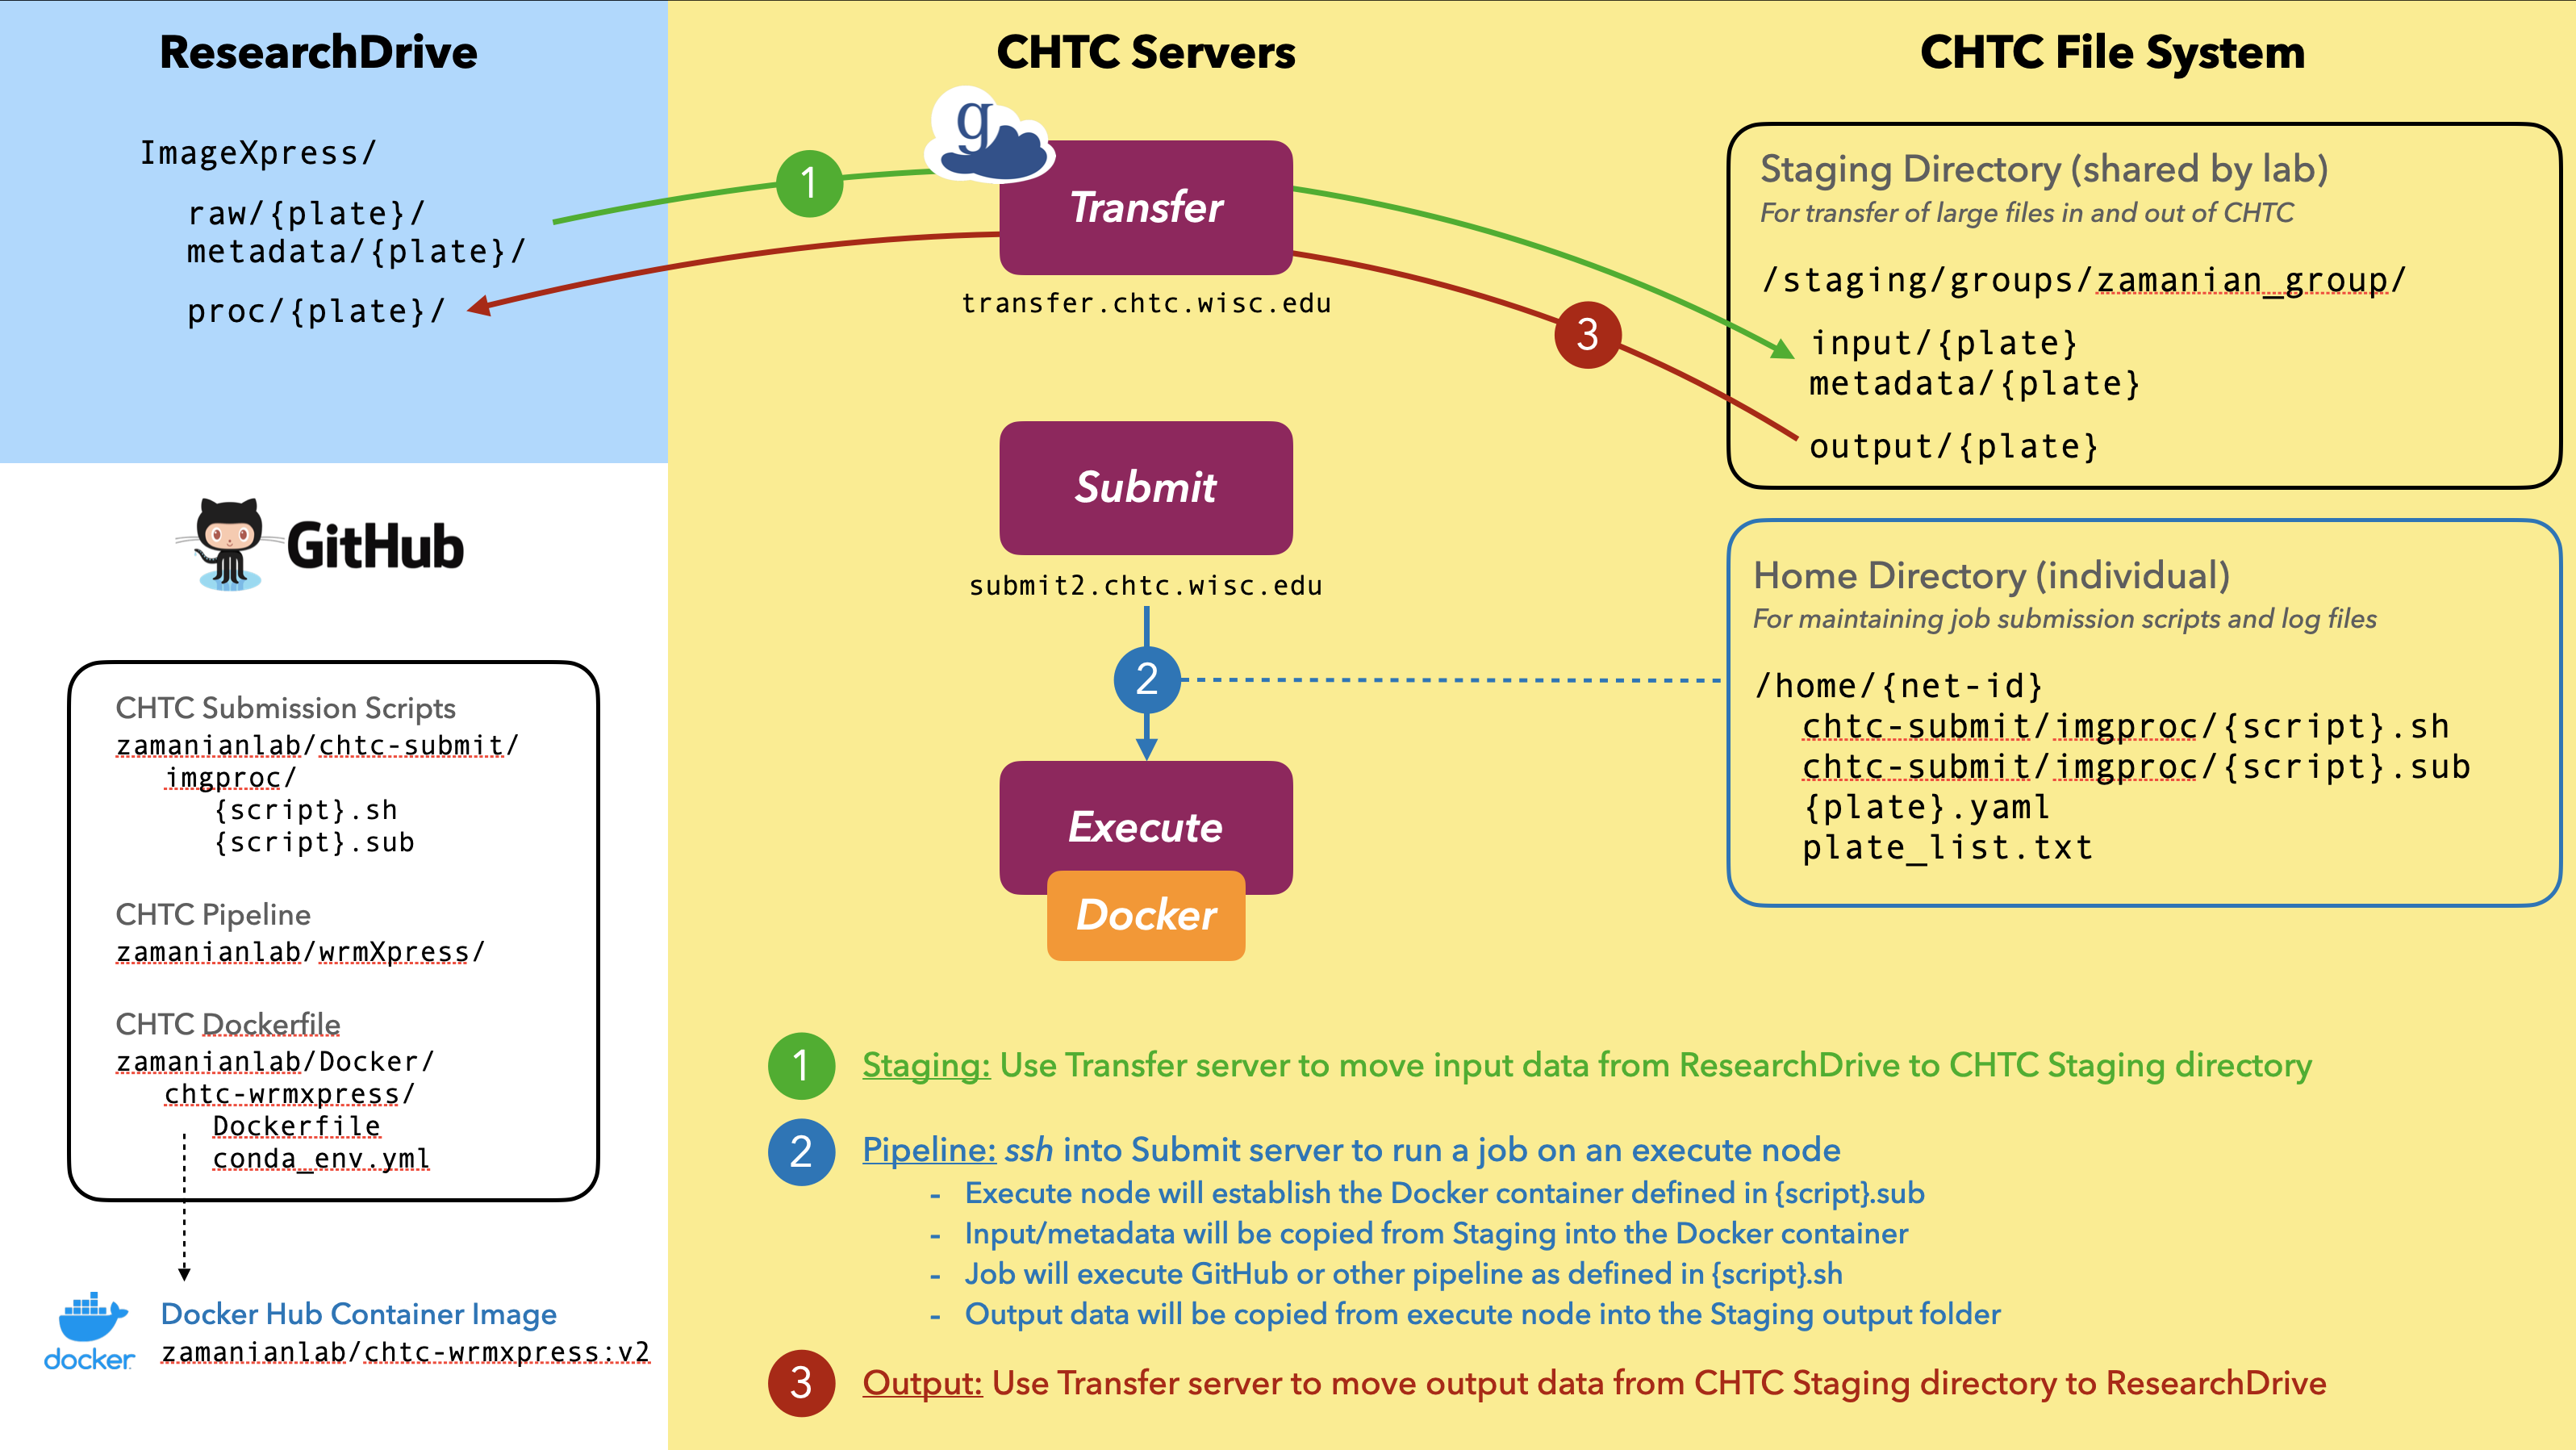
File system: Each net-id is associated with a
homefolder, where we manage job submission scripts. We have a sharedstagingfolder for transfer of large files in/out of the CHTC system. The directory structure of the CHTC is shown below.├── home/{net-id}/ [quota: 20 GB, submit script dir] └── staging/groups/zamanian_group/ [quota: 1 TB | 100k files] └── input/ [input dir: unprocessed (raw) data] └── metadata/ [metadata dir: metadata associated with input data] └── output/ [output dir: processed job outputs]
Pipelines
In general, pipelines will be run in three steps:
- Staging: large input files will be transferred to CHTC Staging from UW ResearchDrive
- Submit: jobs will be submitted to the CHTC to process files using established pipelines
- Output: desired outputs will be transferred from CHTC to UW ResearchDrive and/or Box
1. Staging (ResearchDrive → CHTC)
-
Globus transfer: Globus is the easiest and fastest way to transfer large input data from ResearchDrive to the CHTC staging input folder. Globus is also the most secure transfer method, and allows for transfer from any file system that has a Globus endpoint installed. Most raw data on ResearchDrive is unarchived and uncompressed. However, our pipelines expect a single archived folder (.tar) as input and will deliver a single archived folder as output. Use the workflow below to transfer an unarchived folder on ResearchDrive to CHTC input and archive it after arrival. See the KB for further instructions.
Globus transfer
- Login to the Globus web interface with your NetID
- If transferring from a personal computer, install and start Globus Connect Personal.
- In the web interface, set the view to two panels using the icon on the top right.
- On one side of the interface, click Collection and choose the desired endpoint (
chtc#staging,wisc-drive-mzamanian, or your personal computer). - Choose the other endpoint for the other side of the interface.
- Type
/staging/groups/zamanian_group/into the Path box of thechtc#stagingcollection and press Enter (you may be required to login with your NetID again). - Navigate to the desired directories.
- Drag and drop files to transfer them; you will receive an email upon transfer completion.
- Login to the transfer server and archive the directories in staging
input/andmetadata/with the commandtar -cvf {plate}.tar {plate}. To loop this command for several files, use:for f in *NJW*; do tar -cvf $f.tar $f; done(use a regular expression that will work for your folders). - Delete the original, unarchived directories.
-
Command line transfer with smbclient: It is also possible to transfer via smbclient using the terminal. The following code will also archive the data upon arrival.
ResearchDrive -> CHTC transfer of unarchived raw data folder (archived on arrival)
# Log into transfer server and navigate to staging input dir
ssh {net-id}@transfer.chtc.wisc.edu
cd /staging/groups/zamanian_group/input/

# Example of transferring sequencing data
smbclient -k //research.drive.wisc.edu/mzamanian/ -D "UWBC-Dropbox/Bioinformatics Resource Center" -Tc 201105_AHLVWJDSXY.tar "201105_AHLVWJDSXY"

# Example of transferring ImageXpress data
smbclient -k //research.drive.wisc.edu/mzamanian/ -D "ImageXpress/raw" -Tc 20201118-p01-MZ_172.tar "20201118-p01-MZ_172.tar"
ResearchDrive -> CHTC transfer of unarchived metadata folder (archived on arrival)
# Log into transfer server and navigate to staging metadata dir
ssh {net-id}@transfer.chtc.wisc.edu
cd /staging/groups/zamanian_group/metadata/

# Example of transferring ImageXpress metadata
smbclient -k //research.drive.wisc.edu/mzamanian/ -D "ImageXpress/metadata" -Tc 20201118-p01-MZ_172.tar "20201118-p01-MZ_172"
Note: If you correctly updated your
~/.bash_profileby following the macOS environment setup instructions, then you can use the simpletransfertosshinto the node.For ImageXpress data, an entire experiment may include >10 plates that will take hours to days to transfer. To facilitate batch transfers, we have included two scripts in the
input/andmetadata/directories of/staging/groups/zamanian_group/to help with batch transfer.Batch transfer via custom scripts and
screen- Use a terminal text editor (e.g.,
vimornano) to edit the plate list in/staging/groups/zamanian_group/input/plates.txtsuch that there is a single plate name per line. Also include a blank line at the end of the file. - Use the commands
sh transfer_images.sh(from theinput/directory) andsh transfer_metadata.sh(from themetadata/directory) to transfer the images and metadata, respectively. - Use the
screentool to maintain a continuous process in the background, allowing you to close your SSH session.
 1
 2
 3
 4
 5
 6
 7
 8
 9
10
11
12
13
14
15
16
# Log into transfer server and navigate to staging input dir ssh {net-id}@transfer.chtc.wisc.edu cd /staging/groups/zamanian_group/input/ # Start a screen named 'transfer' screen -S transfer # Initiate the transfer sh transfer_images.sh # Detach from the screen by pressing Ctrl+a and then d # Reattach to the screen screen -r transfer # Close the screen exit - Use a terminal text editor (e.g.,
-
Drag-and-drop transfer
Transferring input data should be performed with Globus or background smblient processes. However, smaller files such as metadata or auxiliary parameter files can be moved to the staging directory or one's home directory on the submit server with drag-and-drop SFTP clients such as Transmit, CyberDuck, or FileZilla.
-
Command line transfer with
scpA final option for transfer of small files is via the
scpcommand:ResearchDrive -> CHTC transfer of unarchived metadata folder (archived on arrival)
# transfer to staging
scp [local file] {net-id}@transfer.chtc.wisc.edu:/staging/groups/zamanian_group/input/

# transfer to home
scp [local file] {net-id}@ap2002.chtc.wisc.edu:/home/{net-id}
Warning!
Do not use the last two options (drag-and-drop or scp) for the transfer of many files or large files >100 MB, as these methods are unstable and can be unpredictable. For batch transfer or transfer of large files, the recommended method is Globus.
2. Submit (manage CHTC jobs)
CHTC uses HTCondor for job scheduling. Submission files should follow lab conventions and be consistent with the CHTC documentation. Two example submit scripts with annotations are shown below. This submit scripts (Core_RNAseq-nf.sub/wrmXpress.sub) load a pre-defined Docker environment and run a bash executable script (Core_RNAseq-nf.sh/wrmXpress.sh) with defined arguments on the execute node. Other options define log files, resource requirements, and transfer of files in/out of home. Large files should not be transferred in/out of home, but you may need to transfer auxiliary files (for example, the parameters YAML file for wrmXpress jobs). We transfer in our large data through /staging/groups/zamanian_group/input/ and we move job output files to /staging/groups/zamanian_group/output/ within the job executable script to avoid their transfer to home upon job completion. The only files that should be transferred back to home are small log files.
Example CHTC job submission scripts (.sub / .sh)
1 2 3 4 5 6 7 8 9 10 11 12 13 14 15 16 17 18 19 20 21 22 23 24 25 26 27 28 29 30 31 32 33 34 | |
1 2 3 4 5 6 7 8 9 10 11 12 13 14 15 16 17 18 19 20 21 22 23 24 25 26 27 28 29 30 31 32 33 34 | |
1 2 3 4 5 6 7 8 9 10 11 12 13 14 15 16 17 18 19 20 21 22 23 24 25 26 27 28 29 30 31 32 33 34 | |
1 2 3 4 5 6 7 8 9 10 11 12 13 14 15 16 17 18 19 20 21 22 23 24 25 26 27 28 29 30 31 32 33 34 35 36 37 38 39 40 41 42 | |
Log into submit node to submit a job,
ssh {net-id}@ap2002.chtc.wisc.edu

condor_submit Core_RNAseq-nf.sub dir=191211_AHMMC5DMXX script=Core_RNAseq-nf.sh
Other useful commands for monitoring and managing jobs
# check on job status
  condor_q

# remove a specific job
  condor_rm [job id]

# remove all jobs for user
  condor_rm $USER

# interative shell to running job on remote machine
  condor_ssh_to_job [job id]
  exit
3. Output (CHTC → ResearchDrive)
To transfer your job output folder from the CHTC staging output directory to ResearchDrive or your desktop, it is easiest to use Globus or an SFTP client (e.g., CyberDuck). It also possible to use the command line to transfer outputs to ResearchDrive or your desktop.
CHTC -> ResearchDrive transfer with smbclient
# log into CHTC staging server and navigate to output folder
ssh {net-id}@transfer.chtc.wisc.edu
cd /staging/groups/zamanian_group/output/

# connect to lab ResearchDrive
smbclient -k //research.drive.wisc.edu/mzamanian

# turn off prompting and turn on recursive
smb: \> prompt
smb: \> recurse

# navigate to ResearchDrive dir for processed data (example)
smb: \> cd /ImageXpress/proc/

# transfer output data folder (example)
smb: \> mput 20201119-p01-MZ_200.tar
CHTC -> Local Computer
# transfer from CHTC staging to current directory
scp -r {net-id}@transfer.chtc.wisc.edu:/staging/groups/zamanian_group/output/[dir] .